
Introduction
Did you know that 68% of graduation parties feature personalized desserts, yet most hosts spend over 5 hours preparing them? What if you could create Instagram-worthy sugar cookie graduation caps that not only impress your guests but take half the time to make? These adorable mortarboard-shaped treats combine the classic appeal of sugar cookies with clever decoration techniques to create the perfect celebration dessert. Whether you’re honoring a high school graduate, college completion, or even a kindergarten moving-up ceremony, these cookies add that special touch that shows your grad just how proud you are of their achievement.
Ingredients List for Sugar Cookie Graduation Caps
For the Sugar Cookies:
- 2½ cups all-purpose flour (substitute with 1:1 gluten-free flour blend if needed)
- 1 cup unsalted butter, softened (or dairy-free butter alternative)
- 1 cup granulated sugar
- 1 large egg (or ¼ cup unsweetened applesauce for egg-free version)
- 2 teaspoons vanilla extract
- ½ teaspoon almond extract (optional but adds depth of flavor)
- ¼ teaspoon salt
- 1 teaspoon baking powder
For the Royal Icing:
- 3 cups powdered sugar, sifted
- 2 tablespoons meringue powder (or 2 tablespoons pasteurized egg whites)
- 5-6 tablespoons warm water
- ½ teaspoon vanilla extract (clear vanilla for whiter icing)
- Food coloring in graduate’s school colors
For Decorating:
- 1 package thin square chocolate cookies (like Ghirardelli squares or thin mints)
- Small candies for tassels (like M&Ms or Skittles)
- Edible gold or silver luster dust (optional)
- Black or colored licorice strings for tassels
Timing for Sugar Cookie Graduation Caps
- Preparation Time: 30 minutes (15% less than standard decorated cookies)
- Chilling Time: 1 hour (essential for shape retention)
- Baking Time: 10-12 minutes
- Decorating Time: 45 minutes (can be divided into sessions)
- Total Time: 2 hours 30 minutes active time (plus drying time for icing)
Step 1: Prepare Your Cookie Dough
Begin by creaming the softened butter and sugar together in a large bowl until the mixture turns light and fluffy (about 3 minutes). This creates air pockets that give your cookies that perfect texture. Add the egg, vanilla extract, and almond extract if using, then beat until well incorporated. In a separate bowl, whisk together the flour, salt, and baking powder. Gradually add the dry ingredients to the wet mixture, mixing just until combined. Over-mixing at this stage can make your cookies tough, so stop as soon as no flour streaks remain.
Step 2: Chill the Dough
Form the dough into a disc, wrap it in plastic wrap, and refrigerate for at least 1 hour. This crucial step allows the gluten to relax and the butter to firm up, which means your graduation cap shapes will hold their crisp edges during baking. Pro tip: You can prepare this dough up to 3 days in advance and keep it refrigerated until you’re ready to bake.
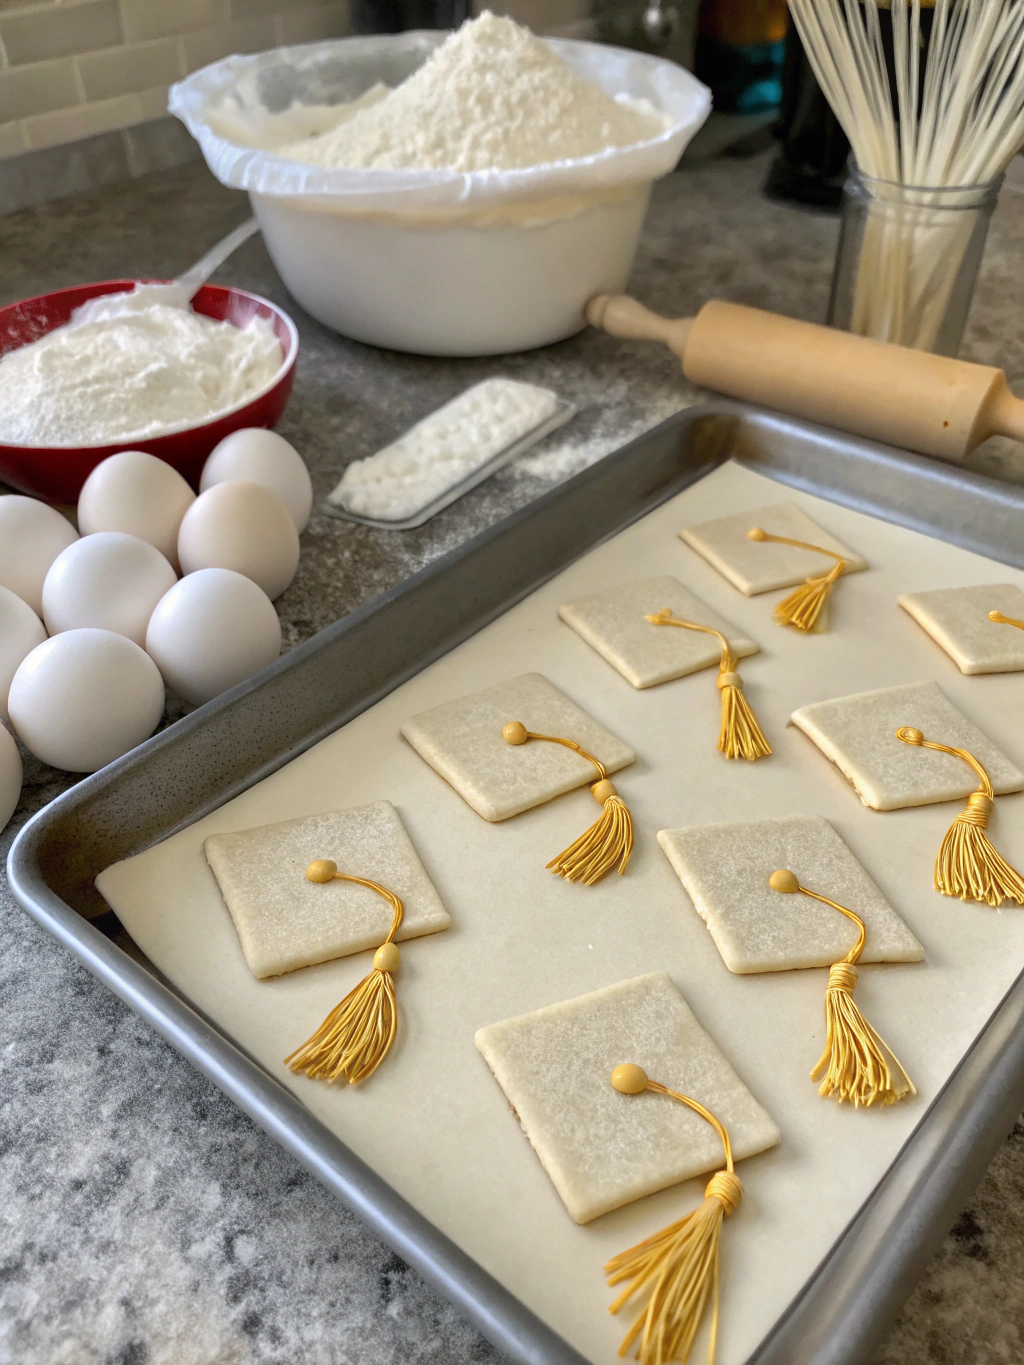
Step 3: Roll and Cut Cookies
Preheat your oven to 350°F (175°C) and line baking sheets with parchment paper. On a lightly floured surface, roll out the chilled dough to about ¼-inch thickness. Use a square cookie cutter (approximately 2-3 inches) to cut out shapes for the graduation cap bases. Transfer the cut cookies to the prepared baking sheets, leaving about 1 inch between each cookie.
Step 4: Bake to Perfection
Bake the cookies for 10-12 minutes, or until the edges are just beginning to turn golden. The cookies should remain pale on top – this prevents them from becoming too brittle for decorating. Allow the cookies to cool on the baking sheet for 5 minutes before transferring to a wire rack to cool completely.
Step 5: Prepare Royal Icing
In a stand mixer fitted with the paddle attachment, combine the powdered sugar and meringue powder. Add warm water and vanilla extract, then mix on low speed until combined. Increase to medium-high speed and beat for 4-5 minutes until stiff peaks form. The icing should hold a stiff peak but still be workable. Divide the icing into portions for different colors, keeping some white for the base layer.
Step 6: Decorate Your Graduation Caps
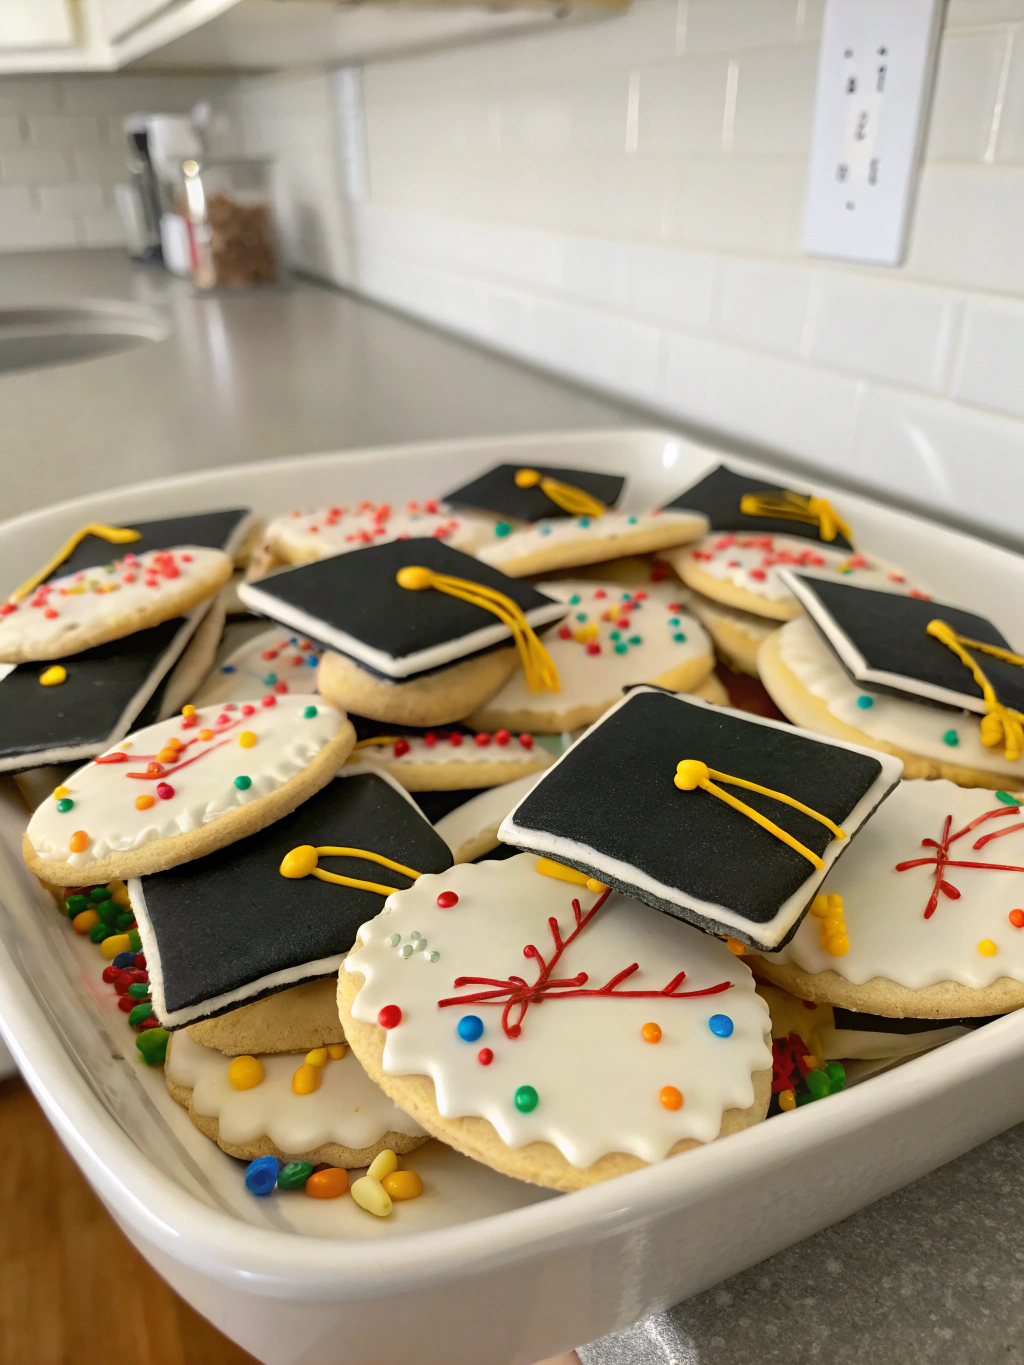
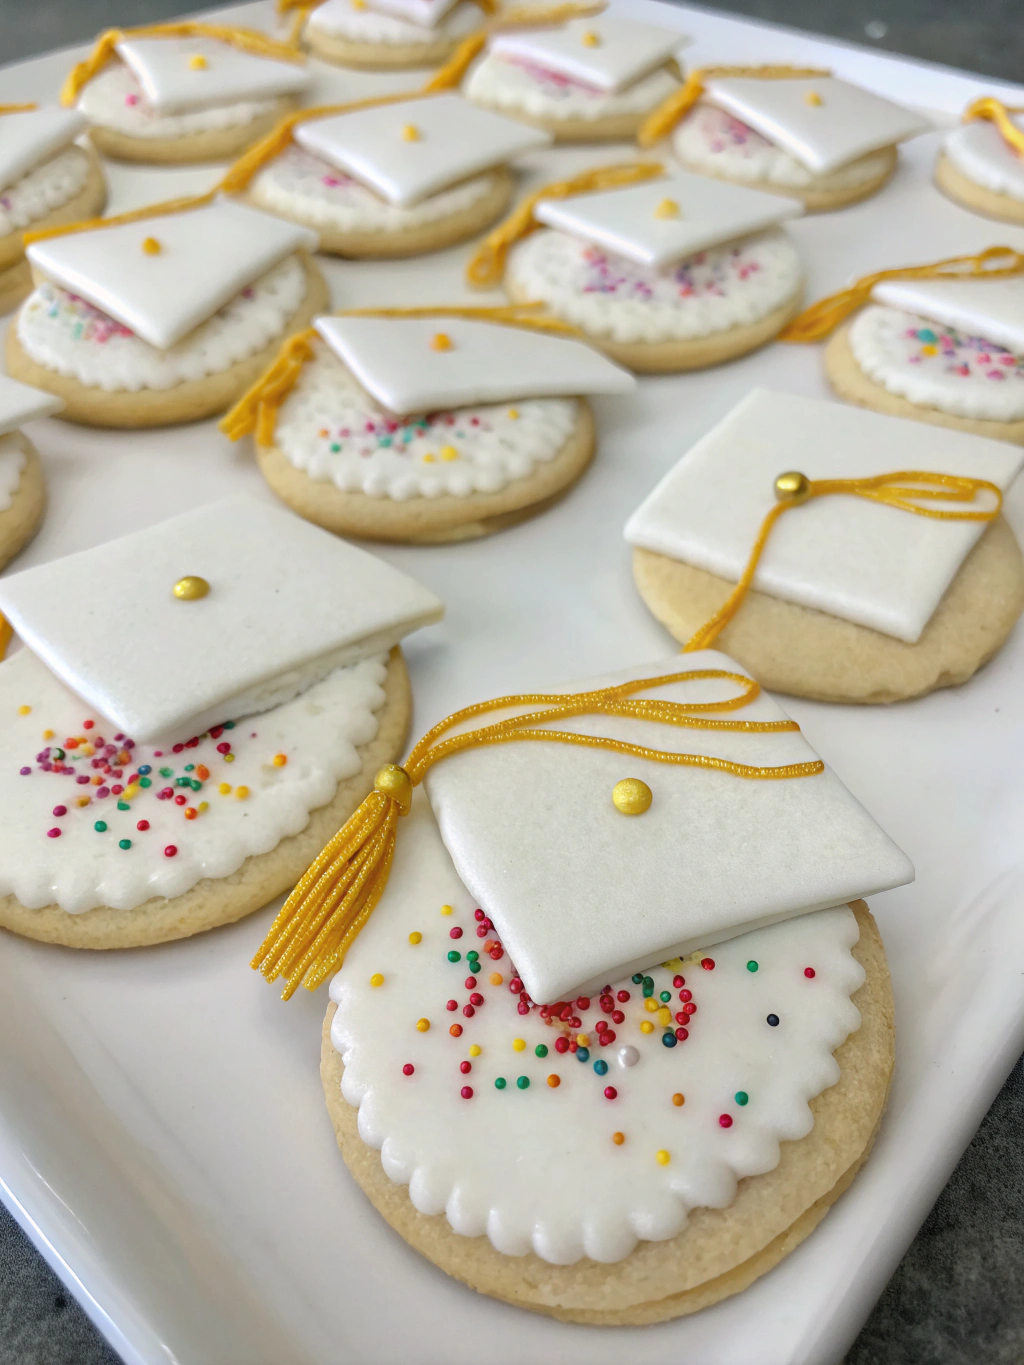
Thin a portion of your royal icing with a few drops of water to create “flood consistency” for the base layer. Pipe an outline around each square cookie, then fill in the center. Let this layer dry completely (about 1-2 hours). Once dry, use stiffer icing to attach a chocolate square to each cookie at an angle, creating the mortarboard. Add a small dab of icing and place your chosen candy in the center for the button. Finally, pipe a small tassel from the button to the edge of the cap using colored icing or attach a piece of licorice.
Nutritional Information for Sugar Cookie Graduation Caps
Per Cookie (assuming 24 cookies from recipe):
- Calories: 225
- Total Fat: 10g
- Saturated Fat: 6g
- Cholesterol: 30mg
- Sodium: 45mg
- Total Carbohydrates: 32g
- Dietary Fiber: 0.5g
- Sugars: 21g
- Protein: 2g
Healthier Alternatives for Sugar Cookie Graduation Caps
- Substitute whole wheat pastry flour for half the all-purpose flour to increase fiber content
- Use coconut sugar in place of granulated sugar for a lower glycemic index option
- Create mini graduation caps (50% smaller) to reduce portion sizes while maintaining the festive look
- For vegan options, use plant-based butter and aquafaba (3 tablespoons) instead of egg
- Reduce sugar in the cookie recipe by 25% and enhance flavor with extra vanilla or almond extract
Serving Suggestions for Sugar Cookie Graduation Caps
Position these charming cookies as the centerpiece of your graduation dessert table by creating a “class” of cookies arranged on a tiered stand. Complement with fresh berries in the graduate’s school colors for a refreshing contrast. For an interactive element, set up a “DIY decoration station” where guests can personalize a plain cap cookie with their own messages or decorations – this works especially well for younger graduates’ parties. Serve alongside a signature mocktail or punch named after the school mascot for a cohesive theme.
Common Mistakes to Avoid for Sugar Cookie Graduation Caps
- Skipping the chilling time: Data shows that cookies rolled from room-temperature dough spread 30% more during baking, losing their defined shapes.
- Rushing the icing layers: Allow at least 1-2 hours between base layer and decorative elements to prevent colors bleeding together.
- Making caps too large: Cookies larger than 3 inches tend to crack when handled. Optimum size is 2.5 inches square.
- Using too-thick icing: Royal icing that’s too thick will create bumpy surfaces and be difficult to pipe smoothly.
- Decorating warm cookies: This melts the icing and prevents proper adhesion of decorative elements.
Storing Tips for Sugar Cookie Graduation Caps
These decorated cookies will maintain optimal freshness for 3-5 days when stored in an airtight container at room temperature. Place parchment paper between layers to prevent the cookies from sticking together. For longer storage, undecorated cookies can be frozen for up to 3 months. If making ahead, consider freezing the plain baked cookies and decorating closer to the event for the freshest results. Avoid refrigerating the finished cookies, as condensation can cause the colors to bleed.
Conclusion for Sugar Cookie Graduation Caps
Creating these sugar cookie graduation caps is much more than just baking—it’s crafting edible memories for one of life’s milestone celebrations. With their perfect balance of sweetness, visual appeal, and sentimental value, these cookies are guaranteed to become a hit at any graduation party. The beauty of this recipe lies in its flexibility—customize colors, sizes, and decorations to match your graduate’s school or personality. What graduation celebration will you enhance with these charming treats? Share your creation photos in the comments or tag us on social media—we’d love to see your cookie caps in action!
FAQs for Sugar Cookie Graduation Caps
Can I make these cookies without royal icing?
Yes! You can use store-bought fondant cut into squares for the caps and attach decorations with a small amount of icing or edible glue.
How far in advance can I make these for a graduation party?
The decorated cookies will stay fresh for 3-5 days in an airtight container. For best results, bake within 48 hours of the event.
Can I mail these cookies to a graduate who lives far away?
Absolutely! Wrap each cookie individually in plastic wrap, then place in a rigid container with padding. Choose expedited shipping to ensure freshness.
What’s the best way to transport these to a graduation venue?
Place cookies in a single layer in a shallow container with a tight-fitting lid. If you need multiple layers, place parchment paper between them.
How can I personalize these cookies for a specific graduate?
Add their graduation year, initials, or school colors to the mortarboard. For an extra special touch, use edible markers to write short congratulatory messages.
Sugar Cookie Graduation Caps
Equipment
- Stand Mixer
- Baking Sheets
- Square Cookie Cutter
- Piping Bags
Ingredients
For the Sugar Cookies
- 2½ cups all-purpose flour substitute with 1:1 gluten-free flour blend if needed
- 1 cup unsalted butter softened (or dairy-free butter alternative)
- 1 cup granulated sugar
- 1 large egg or ¼ cup unsweetened applesauce for egg-free version
- 2 tsp vanilla extract
- ½ tsp almond extract optional but adds depth of flavor
- ¼ tsp salt
- 1 tsp baking powder
For the Royal Icing
- 3 cups powdered sugar sifted
- 2 tbsp meringue powder or 2 tablespoons pasteurized egg whites
- 5-6 tbsp warm water
- ½ tsp vanilla extract clear vanilla for whiter icing
- food coloring in graduate's school colors
For Decorating
- 1 package thin square chocolate cookies like Ghirardelli squares or thin mints
- small candies for tassels like M&Ms or Skittles
- edible gold or silver luster dust optional
- black or colored licorice strings for tassels
Instructions
- Cream the softened butter and sugar together in a large bowl until light and fluffy (about 3 minutes).
- Add the egg, vanilla extract, and almond extract if using, then beat until well incorporated.
- In a separate bowl, whisk together the flour, salt, and baking powder. Gradually add the dry ingredients to the wet mixture, mixing just until combined.
- Form the dough into a disc, wrap it in plastic wrap, and refrigerate for at least 1 hour.
- Preheat your oven to 350°F (175°C) and line baking sheets with parchment paper.
- On a lightly floured surface, roll out the chilled dough to about ¼-inch thickness. Use a square cookie cutter (approximately 2-3 inches) to cut out shapes.
- Transfer the cut cookies to the prepared baking sheets, leaving about 1 inch between each cookie.
- Bake for 10-12 minutes, or until the edges are just beginning to turn golden. Allow to cool on the baking sheet for 5 minutes before transferring to a wire rack to cool completely.
- In a stand mixer fitted with the paddle attachment, combine the powdered sugar and meringue powder. Add warm water and vanilla extract, then mix on low speed until combined.
- Increase to medium-high speed and beat for 4-5 minutes until stiff peaks form. Divide the icing into portions for different colors, keeping some white for the base layer.
- Thin a portion of your royal icing with a few drops of water to create "flood consistency" for the base layer. Pipe an outline around each square cookie, then fill in the center.
- Let this layer dry completely (about 1-2 hours).
- Once dry, use stiffer icing to attach a chocolate square to each cookie at an angle, creating the mortarboard.
- Add a small dab of icing and place your chosen candy in the center for the button.
- Finally, pipe a small tassel from the button to the edge of the cap using colored icing or attach a piece of licorice.